Spring7——開發基於註解形式的spring

開發基於註解形式的spring
SpringIOC容器的2種形式:
(1)xml配置文件:applicationContext.xml; 存bean:<bean> 取bean:

ApplicationContext context=new ClassPathXmlApplicationContext("applicationContext.xml");

(2)註解:帶有@Configuration註解的類(配置類)

存bean:@Bean+方法的返回值

//配置類,相當於applicationContext.xml
@Configuration
public class MyConfig {


    @Bean //id=方法名(myStudent)
    public Student myStudent(){
        Student student=new Student(2,"fg",34);
        return student;
    }
}

取bean: 

ApplicationContext context=new AnnotationConfigApplicationContext(MyConfig.class);
Student myStudent = (Student) context.getBean("myStudent");

注意:兩種形式獲取的IOC是獨立的  
註解形式向IOC容器存放bean詳解:
1.必須有@Configuration
2.形式:
2.1 三層組件(Controller、Service、Dao):             (1)將三層組件分別加註解@Controller、@Service、@Repository等價於@Commponent              (2)納入掃描器 a.xml配置

<context:component-scan base-package="org.ghl.controller"></context:component-scan>

b.註解形式      component-scan只對三層組件負責。    
給掃描器指定規則:                 過濾類型:FilterType(ANNOTATION, ASSIGNABLE_TYPE, CUSTOM)                 ANNOTATION:三層註解類型@Controller、@Service、@Repository等價於@Commponent

排除:
@ComponentScan(value = "org.ghl",excludeFilters = {@ComponentScan.Filter(type = FilterType.ANNOTATION ,value = {Service.class,Repository.class})})
包含:(有默認行為,可以通過useDefaultFilters禁止)
@ComponentScan(value = "org.ghl",includeFilters = {@ComponentScan.Filter(type = FilterType.ANNOTATION ,value = {Service.class,Repository.class})},useDefaultFilters = false)

  ASSIGNABLE_TYPE:指具體的類。

@ComponentScan(value = "org.ghl",includeFilters = {@ComponentScan.Filter(type = FilterType.ASSIGNABLE_TYPE ,value = {StudentController.class})},useDefaultFilters = false)

區分:ANNOTATION:Service.class指標有@Service的所有類;           ASSIGNABLE_TYPE:指具體的類。                 CUSTOM:自定義:自己定義規則

@ComponentScan(value = "org.ghl",includeFilters = {@ComponentScan.Filter(type = FilterType.CUSTOM ,value = {MyFilter.class})},useDefaultFilters = false)


public class MyFilter implements TypeFilter {
    @Override
    public boolean match(MetadataReader metadataReader, MetadataReaderFactory metadataReaderFactory) throws IOException {
        ClassMetadata classMetadata = metadataReader.getClassMetadata();
        //拿到掃描器value = "org.ghl"包中的所有標有三層組件註解類的名字
        String className = classMetadata.getClassName();
        //只過濾出和student相關的三層組件
        if (className.contains("Student")){
            return true;  //表示包含
        }
        return false; //表示排除
    }
}


2.2 非三層組件(Student.clss/轉換器等): (1)@Bean+方法的返回值,id的默認值為方法名,也可以通過@Bean(“stu”)修改。 (2)import/FactoryBean  
bean的作用域

(@Scope(“singleton”))scope=”singleton”:單例 scope=”prototype”:原型、多實例。
執行的時機(產生bean的時機):         singleton:容器在初始化時,就創建對象,且只創建一次; 也支持延遲加載:在第一次使用時,創建對象。在config中加入@Lazy。         prototype:容器在初始化時,不創建對象,在每次使用時(每次從容器獲取對象時),再創建對象。         
條件註解 可以讓某一個Bean在某些條件下加入IOC容器。 (1)準備bean; (2)增加條件bean:給每個bean設置條件,必須實現Condition接口。 (3)根據條件加入IOC容器
  回顧給IOC加入Bean的方法:        註解:全部在@Configuration配置中設置:                 三層組件:掃描器+三層註解                 非三層組件:(1)@Bean+返回值                                      (2)@import                                      (3)FactoryBean(工廠Bean)
 
@import使用:         (1)直接編寫到@Import中; @Import({Apple.class,Banana.class})         (2)自定義ImportSelector接口的實現類,通過selectimports方法實現(方法的返回值就是要納入IOC容器的Bean)。並告知程序自己編寫的實現類。

public class MyImportSelector implements ImportSelector {
    @Override
    public String[] selectImports(AnnotationMetadata annotationMetadata) {
        return new String[]{"org.ghl.entity.Apple","org.ghl.entity.Banana"}; //方法的返回值就是要納入IOC容器的Bean
    }
}
@Import({MyImportSelector.class})

    (3)編寫ImporBeanDefinitionRegistrar接口的實現類並重寫方法。 

public class MyImporBeanDefinitionRegistrar implements ImportBeanDefinitionRegistrar {
    @Override
    public void registerBeanDefinitions(AnnotationMetadata annotationMetadata, BeanDefinitionRegistry beanDefinitionRegistry) {
        //BeanDefinition beanDefinition=new RootBeanDefinition(Orange.class);
        BeanDefinition beanDefinition=new RootBeanDefinition("org.ghl.entity.Orange");
        beanDefinitionRegistry.registerBeanDefinition("myorange",beanDefinition);


    }
}  
@Import({MyImporBeanDefinitionRegistrar.class})


FactoryBean(工廠Bean)         1.寫實現類和重寫方法;  

public class MyFactoryBean implements FactoryBean{
    @Override
    public Object getObject() throws Exception {
        return new Apple();
    }

    @Override
    public Class<?> getObjectType() {
        return Apple.class;
    }

    @Override
    public boolean isSingleton() {
        return true;
    }
}

  2.註冊到@Bean中  

@Bean
public FactoryBean<Apple>  myFactoryBean(){
    return new MyFactoryBean();
}

注意:需要通過&區分獲取的對象是哪一個。不加&,獲取的是最內部真實的apple,如果加&,獲取的是FactoryBean。  


本站聲明:網站內容來源於博客園,如有侵權,請聯繫我們,我們將及時處理

【其他文章推薦】

網頁設計公司推薦不同的風格,搶佔消費者視覺第一線

※廣告預算用在刀口上,台北網頁設計公司幫您達到更多曝光效益

※自行創業缺乏曝光? 網頁設計幫您第一時間規劃公司的形象門面

南投搬家公司費用需注意的眉眉角角,別等搬了再說!

新北清潔公司,居家、辦公、裝潢細清專業服務

※教你寫出一流的銷售文案?

「敢檢討核電海嘯對策就開除你喔!」 解析處處矛盾的福島核災判決

文:宋瑞文(媽媽監督核電廠聯盟特約撰述)

本站聲明:網站內容來源環境資訊中心https://e-info.org.tw/,如有侵權,請聯繫我們,我們將及時處理

【其他文章推薦】

USB CONNECTOR掌控什麼技術要點? 帶您認識其相關發展及效能

台北網頁設計公司這麼多該如何選擇?

※智慧手機時代的來臨,RWD網頁設計為架站首選

※評比南投搬家公司費用收費行情懶人包大公開

※幫你省時又省力,新北清潔一流服務好口碑

※回頭車貨運收費標準

象牙海岸法令鬆綁 開放可可業剷平雨林

環境資訊中心綜合外電;姜唯 編譯;林大利 審校

本站聲明:網站內容來源環境資訊中心https://e-info.org.tw/,如有侵權,請聯繫我們,我們將及時處理

【其他文章推薦】

網頁設計公司推薦不同的風格,搶佔消費者視覺第一線

※廣告預算用在刀口上,台北網頁設計公司幫您達到更多曝光效益

※自行創業缺乏曝光? 網頁設計幫您第一時間規劃公司的形象門面

南投搬家公司費用需注意的眉眉角角,別等搬了再說!

新北清潔公司,居家、辦公、裝潢細清專業服務

※教你寫出一流的銷售文案?

Jmeter系列(32)- 詳解 CSV 數據文件設置

如果你想從頭學習Jmeter,可以看看這個系列的文章哦

https://www.cnblogs.com/poloyy/category/1746599.html


了解一哈什麼是 CSV 文件

  • 為了實現簡單的數據存儲,是一個純文本的文件
  • 最通用的一種文件格式,它可以非常容易地被導入各種PC表格及數據庫中
  • CSV 文件可以用記事本、excel打開;用記事本打開的話,每一列數據都用逗號隔開


為什麼要用 CSV 數據文件?

  • 從外部導入測試數據,相當於數據參數化
  • 通過從文件中導入大量的測試數據,來模擬大量真實用戶發送併發請求


CSV 數據文件設置


CSV 數據文件設置界面介紹


字段含義

字段 含義
Filename 文件名
File encoding 文件編碼
Variable Names
  • 變量名稱
  • 多個變量用 , 分隔
Ignore first line
  • 忽略首行
  • 只在設置了變量名稱后才生效
Delimiter
  • 分隔符
  • 默認 , 
Allow quoted data? 是否允許帶引號
Recycle on EOF? 遇到文件結束符EOF 后再次循環
Stop thread on EOF? 遇到文件結束符EOF 后停止運行線程?
Sharing mode 線程共享模式

後續通過各種栗子來深入理解常用字段的含義


單個字段的栗子

csv 測試數據

這裏用記事本方式當 CSV 數據文件,共有 10 條記錄


線程組結構樹

${num} 是計數器裏面聲明的變量,從 1 開始遞增到 15


線程組屬性

線程數和數據量一致,都是 15


csv 數據文件設置


運行結果


知識點

  • 忽略首行 True:一般首行都是字段名字,比如栗子的 mobile,一般都需要忽略除非沒有字段名
  • 是否允許帶引號 False:可以看到有引號的三條記錄 8、9、10,都還是保留了引號
  • 再次循環 True:csv 文件共有 10 條記錄,但線程數有 15 個,循環 10 次后,重頭開始循環;可以看到 11-15的手機號和1-5的手機號
  • 停止線程 False:取了 10 次值之後就到了文件尾部,但並不會停止運行線程,後面會舉個反例


多個字段的綜合栗子

csv 測試數據

兩個字段,共有 10 條記錄,最後三條記錄有分別有三種引號


csv 數據文件設置

線程組結構樹和上面栗子差不多一樣,線程數仍然 = 15

和第一個例子的配置項相反:不忽略首行,允許帶引號,遇到文件結束符不再循環


運行結果

  • 不忽略首行就會把首行的字段名都返回回來,如:1-mobile-age
  • 數據有雙引號 “” 時,會把雙引號忽略掉,  單引號不算
  • EOF 是文件結束符,沒有開啟再次循環時,會直接返回 EOF


開啟遇到文件結束符停止線程

還是上個栗子的線程組,只是改了下配置項


運行結果

可以看到,線程數 = 15,但只有 10 條數據,當跑了 10 個線程后,沒有數據了,所以停止運行

本站聲明:網站內容來源於博客園,如有侵權,請聯繫我們,我們將及時處理
【其他文章推薦】

USB CONNECTOR掌控什麼技術要點? 帶您認識其相關發展及效能

台北網頁設計公司這麼多該如何選擇?

※智慧手機時代的來臨,RWD網頁設計為架站首選

※評比南投搬家公司費用收費行情懶人包大公開

※幫你省時又省力,新北清潔一流服務好口碑

※回頭車貨運收費標準

Java 多線程基礎(十二)生產者與消費者

 Java 多線程基礎(十二)生產者與消費者

一、生產者與消費者模型

生產者與消費者問題是個非常典型的多線程問題,涉及到的對象包括“生產者”、“消費者”、“倉庫”和“產品”。他們之間的關係如下:

①、生產者僅僅在倉儲未滿時候生產,倉滿則停止生產。
②、消費者僅僅在倉儲有產品時候才能消費,倉空則等待。
③、當消費者發現倉儲沒產品可消費時候會通知生產者生產。
④、生產者在生產出可消費產品時候,應該通知等待的消費者去消費。

生產者消費者模型具體來講,就是在一個系統中,存在生產者和消費者兩種角色,他們通過內存緩衝區進行通信,生產者生產消費者需要的資料,消費者把資料做成產品。生產消費者模式如下圖。

在日益發展的服務類型中,譬如註冊用戶這種服務,它可能解耦成好幾種獨立的服務(賬號驗證,郵箱驗證碼,手機短信碼等)。它們作為消費者,等待用戶輸入數據,在前台數據提交之後會經過分解併發送到各個服務所在的url,分發的那個角色就相當於生產者。消費者在獲取數據時候有可能一次不能處理完,那麼它們各自有一個請求隊列,那就是內存緩衝區了。做這項工作的框架叫做消息隊列。

二、生產者與消費者實現

下面通過生產包子的例子及wait()/notify()方式實現該模型(後面學習線程池相關內容之後,再通過其它方式實現生產/者消費者模型)。

麵包類:

public class Bread {
    private int capacity;    // 麵包的容量
    private int size;        // 麵包的實際數量
    public Bread(int capacity) {
        this.capacity = capacity;
        this.size = 0;
    }
    
    // 生產麵包
    public synchronized void produce(int val) {
        try {
             // left 表示“想要生產的數量”(有可能生產量太多,需多此生產)
            int left = val;
            while (left > 0) {
                // 庫存已滿時,等待“消費者”消費產品。
                while (size >= capacity)
                    wait();
                // 獲取“實際生產的數量”(即庫存中新增的數量)
                // 如果“庫存”+“想要生產的數量”>“總的容量”,則“實際增量”=“總的容量”-“當前容量”。(此時填滿倉庫)
                // 否則“實際增量”=“想要生產的數量”
                int inc = (size+left)>capacity ? (capacity-size) : left;
                size += inc;
                left -= inc;
                System.out.printf("%s produce(%3d) --> left=%3d, inc=%3d, size=%3d\n",
                        Thread.currentThread().getName(), val, left, inc, size);
                // 通知“消費者”可以消費了。
                notifyAll();
            }
        }catch(InterruptedException e) {
            e.printStackTrace();
        }
    }
    // 消費麵包
    public synchronized void consume(int val) {
        try {
             // left 表示“客戶要消費數量”(有可能消費量太大,庫存不夠,需多此消費)
            int left = val;
            while (left > 0) {
                // 庫存為0時,等待“生產者”生產產品。
                while (size <= 0)
                    wait();
                // 獲取“實際消費的數量”(即庫存中實際減少的數量)
                // 如果“庫存”<“客戶要消費的數量”,則“實際消費量”=“庫存”;
                // 否則,“實際消費量”=“客戶要消費的數量”。
                int dec = (size<left) ? size : left;
                size -= dec;
                left -= dec;
                System.out.printf("%s consume(%3d) <-- left=%3d, dec=%3d, size=%3d\n",
                        Thread.currentThread().getName(), val, left, dec, size);
                notifyAll();
            }
        } catch (InterruptedException e) {
            e.printStackTrace();
        }
    }
}

生產者類

public class Producer{
    Bread bread;
    public Producer(Bread bread) {
        this.bread = bread;
    }
    public void produce(final int val) {
        new Thread(() -> {
            bread.produce(val);
        }).start();;
    }
}

消費者類

public class Customer {
    private Bread bread;
    public Customer(Bread bread) {
        this.bread = bread;
    }
    public void consume(final int val) {
        new Thread(() -> {
            bread.consume(val);
        }).start();;
    }
}

測試類代碼

public class Demo {
    public static void main(String[] args) {
        Bread bread = new Bread(100);
        Producer producer = new Producer(bread);
        Cunstomer customer = new Customer(bread);
        
        producer.produce(60);
        producer.produce(120);
        consumer.consume(90);
        consumer.consume(150);
        producer.produce(110);
    }
}
// 運行結果
Thread-1 produce( 60) --> left=  0, inc= 60, size= 60
Thread-5 produce(110) --> left= 70, inc= 40, size=100
Thread-4 consume(150) <-- left= 50, dec=100, size=  0
Thread-2 produce(120) --> left= 20, inc=100, size=100
Thread-3 consume( 90) <-- left=  0, dec= 90, size= 10
Thread-4 consume(150) <-- left= 40, dec= 10, size=  0
Thread-5 produce(110) --> left=  0, inc= 70, size= 70
Thread-4 consume(150) <-- left=  0, dec= 40, size= 30
Thread-2 produce(120) --> left=  0, inc= 20, size= 50

說明:

①、Producer是“生產者”類,它與“麵包(bread)”關聯。當調用“生產者”的produce()方法時,它會新建一個線程並向“麵包類”中生產產品。
②、Customer是“消費者”類,它與“麵包(bread)”關聯。當調用“消費者”的consume()方法時,它會新建一個線程並消費“麵包類”中的產品。
③、Bread是麵包類,記錄“麵包的產量(capacity)”以及麵包當前實際數目(size)”。
        麵包類的生產方法produce()和消費方法consume()方法都是synchronized方法,進入synchronized方法體,意味着這個線程獲取到了該“麵包”對象的同步鎖。這也就是說,同一時間,生產者和消費者線程只能有一個能運行。通過同步鎖,實現了對“殘酷”的互斥訪問。
       對於生產方法 produce() 而言:當麵包量滿時,生產者線程等待,需要等待消費者消費產品之後,生產線程才能生產;生產者線程生產完麵包之後,會通過 notifyAll() 喚醒同步鎖上的所有線程,包括“消費者線程”,即我們所說的“通知消費者進行消費”。
      對於消費方法consume()而言:當倉庫為空時,消費者線程等待,需要等待生產者生產產品之後,消費者線程才能消費;消費者線程消費完產品之後,會通過 notifyAll() 喚醒同步鎖上的所有線程,包括“生產者線程”,即我們所說的“通知生產者進行生產”。

本站聲明:網站內容來源於博客園,如有侵權,請聯繫我們,我們將及時處理

【其他文章推薦】

網頁設計公司推薦不同的風格,搶佔消費者視覺第一線

※廣告預算用在刀口上,台北網頁設計公司幫您達到更多曝光效益

※自行創業缺乏曝光? 網頁設計幫您第一時間規劃公司的形象門面

南投搬家公司費用需注意的眉眉角角,別等搬了再說!

新北清潔公司,居家、辦公、裝潢細清專業服務

※教你寫出一流的銷售文案?

特斯拉與 BMW 談合作 可望發展碳纖維與電池技術

特斯拉(Tesla)明星執行長 Elon Musk 爆料,德國豪華車品牌 BMW 與特斯拉曾洽商合作,範圍涵蓋電池與輕量化車體零件。   Musk 在接受德國媒體 Der Spiegel 專訪時表示,對 BMW 以碳纖維材料強化車體感到非常有興趣,認為相當具成本效益,雙方在非正式場合會面時,有討論過合作的可能,但尚未達成決議。   據路透社報導,BMW 為發展碳纖維原料而成立合資公司 SGL,i3 電動車與 i8 油電混合動力跑車的駕駛艙與後蓋零件均採用到碳纖維材料。除此之外,Musk 還透露有意與 BMW 一起搞電池科技,以及電動車充電站,他甚至於計畫 5~6 年內在德國蓋一座電池廠。

本站聲明:網站內容來源於EnergyTrend https://www.energytrend.com.tw/ev/,如有侵權,請聯繫我們,我們將及時處理

【其他文章推薦】

網頁設計公司推薦不同的風格,搶佔消費者視覺第一線

※廣告預算用在刀口上,台北網頁設計公司幫您達到更多曝光效益

※自行創業缺乏曝光? 網頁設計幫您第一時間規劃公司的形象門面

南投搬家公司費用需注意的眉眉角角,別等搬了再說!

新北清潔公司,居家、辦公、裝潢細清專業服務

※教你寫出一流的銷售文案?

【JAVA8新的時間與日期 API】- 傳統時間格式化的線程安全問題

Java8之前的日期和時間API,存在一些問題,最重要的就是線程安全的問題。這些問題都在Java8中的日期和時間API中得到了解決,而且Java8中的日期和時間API更加強大。

傳統時間格式化的線程安全問題

示例:

import java.text.SimpleDateFormat;
import java.util.ArrayList;
import java.util.Date;
import java.util.List;
import java.util.concurrent.*;

public class TestOldSimpleDateFormat {
    public static void main(String[] args) throws Exception {
        SimpleDateFormat sdf = new SimpleDateFormat("yyyy-MM-dd");
        Callable<Date> task = new Callable<Date>() {
            @Override
            public Date call() throws Exception {
                return sdf.parse("2020-01-01");
            }
        };
        ExecutorService pool = Executors.newFixedThreadPool(10);
        List<Future<Date>> list = new ArrayList<>();
        for (int i=0;i<10;i++){
            Future<Date> future = pool.submit(task);
            list.add(future);
        }
        for (Future<Date> future : list){
            System.out.println(future.get());
        }

     pool.shutdown(); } }

以上代碼運行會報錯:


報錯緣由:取部分源碼解釋

    /**
     * SimpleDateFormat 類的 parse 方法 部分源碼
     */
    public Date parse(String source) throws ParseException
    {
        ParsePosition pos = new ParsePosition(0);
        Date result = parse(source, pos); 
        if (pos.index == 0)
            throw new ParseException("Unparseable date: \"" + source + "\"" ,
                pos.errorIndex);
        return result;
    }

public Date parse(String text, ParsePosition pos)
    {
        // 省略上面諸多代碼
        Date parsedDate;

        CalendarBuilder calb = new CalendarBuilder();
        try {
            //這裏這個 calendar 對象是 SimpleDateFormat 類的父類 DateFormat 中的屬性  : protected Calendar calendar;
            parsedDate = calb.establish(calendar).getTime();//這個 calb.establish(calendar) 方法中,這個方法中的主要步驟不是原子操作,並且會對 calendar 對象進行修改,所以在多線程環境下就會出現線程安全問題。
            // 省略下面面諸多代碼
        }
        catch (IllegalArgumentException e) {
            //省略.........................
            return null;
        }
        return parsedDate;
    }
 Calendar establish(Calendar cal) {
        boolean weekDate = isSet(WEEK_YEAR)
                            && field[WEEK_YEAR] > field[YEAR];
        if (weekDate && !cal.isWeekDateSupported()) {
            // Use YEAR instead
            if (!isSet(YEAR)) {
                set(YEAR, field[MAX_FIELD + WEEK_YEAR]);
            }
            weekDate = false;
        }

        cal.clear();
        // Set the fields from the min stamp to the max stamp so that
        // the field resolution works in the Calendar.
        for (int stamp = MINIMUM_USER_STAMP; stamp < nextStamp; stamp++) {
            for (int index = 0; index <= maxFieldIndex; index++) {
                if (field[index] == stamp) {
                    cal.set(index, field[MAX_FIELD + index]);
                    break;
                }
            }
        }

        if (weekDate) {
            int weekOfYear = isSet(WEEK_OF_YEAR) ? field[MAX_FIELD + WEEK_OF_YEAR] : 1;
            int dayOfWeek = isSet(DAY_OF_WEEK) ?
                                field[MAX_FIELD + DAY_OF_WEEK] : cal.getFirstDayOfWeek();
            if (!isValidDayOfWeek(dayOfWeek) && cal.isLenient()) {
                if (dayOfWeek >= 8) {
                    dayOfWeek--;
                    weekOfYear += dayOfWeek / 7;
                    dayOfWeek = (dayOfWeek % 7) + 1;
                } else {
                    while (dayOfWeek <= 0) {
                        dayOfWeek += 7;
                        weekOfYear--;
                    }
                }
                dayOfWeek = toCalendarDayOfWeek(dayOfWeek);
            }
            cal.setWeekDate(field[MAX_FIELD + WEEK_YEAR], weekOfYear, dayOfWeek);
        }
        return cal;
    }

綜上,我們可以看到 SimpleDateFormat 類中的parse 方法,調用了 CalendarBuilder 的 establish(calendar) 方法,並在方法中,對 calendar 對象進行了各種判斷及修改,並且這些操作都不是原子操作或同步操作,而這個calendar 對象又是 SimpleDateFormat 的父類 DateFormat 的一個實例變量,所以,在多線程同時調用SimpleDateFormat 的 parse 方法的時候,就會出現線程安全問題。


針對以上異常,JAVA8之前的解決辦法:

1. 將 SimpleDateFormat 對象定義成局部變量。

2. 加鎖。

3. 使用ThreadLocal,每個線程都擁有自己的SimpleDateFormat對象副本。

示例(加鎖):

        SimpleDateFormat sdf = new SimpleDateFormat("yyyy-MM-dd");
        Callable<Date> task = new Callable<Date>() {
            @Override
            public synchronized Date call() throws Exception {//加個同步,解決問題
                return sdf.parse("2020-01-01");
//                return DateFormatThreadLocal.convert("2020-01-01");
            }
        };
        ExecutorService pool = Executors.newFixedThreadPool(10);
        List<Future<Date>> list = new ArrayList<>();
        for (int i=0;i<10;i++){
            Future<Date> future = pool.submit(task);
            list.add(future);
        }
        for (Future<Date> future : list){
            System.out.println(future.get());
        }
        pool.shutdown();


示例(ThreadLocal):

import java.text.DateFormat;
import java.text.SimpleDateFormat;
import java.util.Date;

public class DateFormatThreadLocal {
    private static final ThreadLocal<DateFormat> df = new ThreadLocal<DateFormat>() {
        protected DateFormat initialValue() {
            return new SimpleDateFormat("yyyy-MM-dd");
        }
    };
    public static Date convert(String source) throws Exception {
        return df.get().parse(source);
    }
}


////////////////////////////////////////////////////////////////

public class TestOldSimpleDateFormat {
    public static void main(String[] args) throws Exception {
//        SimpleDateFormat sdf = new SimpleDateFormat("yyyy-MM-dd");
        Callable<Date> task = new Callable<Date>() {
            @Override
            public Date call() throws Exception {
//                return sdf.parse("2020-01-01");
                return DateFormatThreadLocal.convert("2020-01-01");
            }
        };
        ExecutorService pool = Executors.newFixedThreadPool(10);
        List<Future<Date>> list = new ArrayList<>();
        for (int i=0;i<10;i++){
            Future<Date> future = pool.submit(task);
            list.add(future);
        }
        for (Future<Date> future : list){
            System.out.println(future.get());
        }
     pool.shutdown();
} }


JAVA8的解決辦法:使用新的API(DateTimeFormatter  和 LocalDate )

示例:

import java.time.LocalDate;
import java.time.format.DateTimeFormatter;
import java.util.ArrayList;
import java.util.List;
import java.util.concurrent.*;

public class TestOldSimpleDateFormat {
    public static void main(String[] args) throws Exception {
        DateTimeFormatter formatter = DateTimeFormatter.ofPattern("yyyy-MM-dd");

        Callable<LocalDate> task = new Callable<LocalDate>() {
            @Override
            public LocalDate call() throws Exception {
//                return sdf.parse("2020-01-01");
                return LocalDate.parse("2020-01-01",formatter);
            }
        };
        ExecutorService pool = Executors.newFixedThreadPool(10);
        List<Future<LocalDate>> list = new ArrayList<>();
        for (int i=0;i<10;i++){
            Future<LocalDate> future = pool.submit(task);
            list.add(future);
        }
        for (Future<LocalDate> future : list){
            System.out.println(future.get());
        }
        pool.shutdown();
    }
}


本站聲明:網站內容來源於博客園,如有侵權,請聯繫我們,我們將及時處理
【其他文章推薦】

USB CONNECTOR掌控什麼技術要點? 帶您認識其相關發展及效能

台北網頁設計公司這麼多該如何選擇?

※智慧手機時代的來臨,RWD網頁設計為架站首選

※評比南投搬家公司費用收費行情懶人包大公開

※幫你省時又省力,新北清潔一流服務好口碑

※回頭車貨運收費標準

Halcon斑點分析官方示例講解

官方示例中有許多很好的例子可以幫助大家理解和學習Halcon,下面舉幾個經典的斑點分析例子講解一下
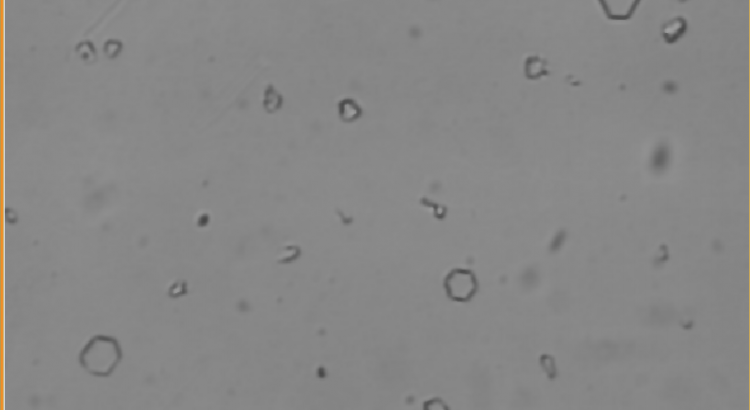
Crystals

圖中显示了在高層大氣中採集到的晶體樣本的圖像。任務是分析對象以確定特定形狀的頻率。重要的對象之一是六角形。

首先,使用read_image從文件中讀取圖像。由於晶體的對比度相對較低且結合了不均勻的背景,因此使用局部閾值執行對象的分割。該輪次由平均過濾器mean_image確定。選擇濾光罩的尺寸,使其具有暗區寬度的大約三倍。 dyn_threshold現在將平滑的和原始的灰色進行比較,選擇那些通過8個灰度值的對比而變暗的像素。connection將對象分為連接的組件。下圖显示了此初始分割的結果。

read_image (Image, 'crystal')
mean_image (Image, ImageMean, 21, 21)
dyn_threshold (Image, ImageMean, RegionDynThresh, 8, 'dark')
connection (RegionDynThresh, ConnectedRegions)

現在的任務是僅選擇六邊形的晶體。為此,首先變成他們的凸包,這就像在每個區域周圍都使用橡皮筋。在這些區域中,選擇那些具有較大的(select_shape)並具有給定灰度值分佈(select_gray)的對象。確定選擇的參數,以便僅保留相關的晶體如下圖。

shape_trans (ConnectedRegions, ConvexRegions, 'convex')
select_shape (ConvexRegions, LargeRegions, 'area', 'and', 600, 2000)
select_gray (LargeRegions, Image, Crystals, 'entropy', 'and', 1, 5.6)

源程序

* crystal.hdev: extraction of hexagonally shaped crystals via local thresholding and region post-processing
* 
dev_close_window ()
dev_update_window ('off')
* ****
* step: acquire image獲取圖像
* ****
read_image (Image, 'crystal')
get_image_size (Image, Width, Height)
dev_open_window_fit_image (Image, 0, 0, Width, Height, WindowID)
set_display_font (WindowID, 12, 'mono', 'true', 'false')
dev_set_draw ('margin')
dev_set_line_width (2)
dev_display (Image)
disp_continue_message (WindowID, 'black', 'true')
stop ()
* ****
* step: segment image分割圖像
* ****
* -> using a local threshold
mean_image (Image, ImageMean, 21, 21)
dyn_threshold (Image, ImageMean, RegionDynThresh, 8, 'dark')
* -> extract connected components
connection (RegionDynThresh, ConnectedRegions)
dev_display (ConnectedRegions)
disp_continue_message (WindowID, 'black', 'true')
stop ()
* ****
* step: process regions處理區域
* ****
shape_trans (ConnectedRegions, ConvexRegions, 'convex')
select_shape (ConvexRegions, LargeRegions, 'area', 'and', 600, 2000)
select_gray (LargeRegions, Image, Crystals, 'entropy', 'and', 1, 5.6)
dev_display (Image)
dev_display (Crystals)
Atoms

專業顯微鏡能夠確定單個原子的大致位置,這對於例如分析PN結晶體的晶格變化很有用,使用分水嶺方法在這類圖片上細分效果很好。在這裏,每個暗區作為單個區域返回。因為在圖像的外部原子僅部分可見,第一個任務是僅提取那些不靠近圖像邊界的原子。最後提取不規則,這是通過尋找形狀(被擠壓)的異常原子實現的。

gauss_filter (Image, ImageGauss, 5)
watersheds (ImageGauss, Basins, Watersheds)

select_shape (Basins, SelectedRegions1, 'column1', 'and', 2, Width - 1)
select_shape (SelectedRegions1, SelectedRegions2, 'row1', 'and', 2, Height - 1)
select_shape (SelectedRegions2, SelectedRegions3, 'column2', 'and', 1, Width - 3)
select_shape (SelectedRegions3, Inner, 'row2', 'and', 1, Height - 3)
select_shape (Inner, Irregular, ['moments_i1','moments_i1'], 'or', [0,9.5e8], [1.5e8,1e10])

分水嶺方法劃分圖像

結果圖

源程序

* atoms.hdev: Locates irregularities in an atomic grid structure
* 
dev_close_window ()
dev_update_window ('off')
* ****
* Acquire image獲取圖像
* ****
read_image (Image, 'atoms')
get_image_size (Image, Width, Height)
crop_rectangle1 (Image, Image, Height / 2, 0, Height - 1, Width - 1)
get_image_size (Image, Width, Height)
dev_open_window_fit_image (Image, 0, 0, -1, -1, WindowID)
set_display_font (WindowID, 14, 'mono', 'true', 'false')
dev_set_draw ('margin')
dev_set_line_width (2)
dev_display (Image)
disp_message (WindowID, 'Original image', 'window', 12, 12, 'black', 'true')
disp_continue_message (WindowID, 'black', 'true')
stop ()
* ****
* Segment image分割圖像
* ****
* -> Using watershed
gauss_filter (Image, ImageGauss, 5)
watersheds (ImageGauss, Basins, Watersheds)
dev_display (Image)
dev_set_colored (12)
dev_display (Watersheds)
disp_message (WindowID, 'Watersheds', 'window', 12, 12, 'black', 'true')
disp_continue_message (WindowID, 'black', 'true')
stop ()
* ****
* Process regions處理區域
* ****
* -> Skip regions at the border of the image
smallest_rectangle1 (Basins, Row1, Column1, Row2, Column2)
select_shape (Basins, SelectedRegions1, 'column1', 'and', 2, Width - 1)
select_shape (SelectedRegions1, SelectedRegions2, 'row1', 'and', 2, Height - 1)
select_shape (SelectedRegions2, SelectedRegions3, 'column2', 'and', 1, Width - 3)
select_shape (SelectedRegions3, Inner, 'row2', 'and', 1, Height - 3)
* -> Select irregularly shaped atoms
select_shape (Inner, Irregular, ['moments_i1','moments_i1'], 'or', [0,9.5e8], [1.5e8,1e10])
dev_display (Image)
dev_set_line_width (1)
dev_set_color ('white')
dev_display (Inner)
dev_set_line_width (3)
dev_set_color ('red')
dev_display (Irregular)
disp_message (WindowID, 'Defects', 'window', 12, 12, 'black', 'true')
Analyzing Particles

本示例的任務是分析液體中的顆粒。此應用程序的主要困難是存在兩種類型的物體:大的明亮物體和對比度低的小物體。此外,還存在噪音干擾。

該程序使用兩種不同的方法分別對兩類對象進行分段:全局閾值和局部閾值。通過附加的后處理,可以以可靠的方式提取小顆粒。

threshold (Image, Large, 110, 255)
dilation_circle (Large, LargeDilation, 7.5)

complement (LargeDilation, NotLarge)
reduce_domain (Image, NotLarge, ParticlesRed)
mean_image (ParticlesRed, Mean, 31, 31)
dyn_threshold (ParticlesRed, Mean, SmallRaw, 3, 'light')
opening_circle (SmallRaw, Small, 2.5)
connection (Small, SmallConnection)

源程序

* particle.hdev: Measurement of small particles
* 
dev_update_off ()
dev_close_window ()
dev_open_window (0, 0, 512, 512, 'black', WindowID)
set_display_font (WindowID, 14, 'mono', 'true', 'false')
read_image (Image, 'particle')
dev_display (Image)
dev_disp_text ('Original image', 'window', 12, 12, 'black', [], [])
dev_disp_text ('Press Run (F5) to continue', 'window', 'bottom', 'right', 'black', [], [])
stop ()
threshold (Image, Large, 110, 255)
* Dilate regions with a circular structuring element
dilation_circle (Large, LargeDilation, 7.5)
dev_display (Image)
dev_set_draw ('margin')
dev_set_line_width (3)
dev_set_color ('red')
dev_display (LargeDilation)
dev_set_draw ('fill')
dev_disp_text ('Exclude large areas from processing', 'window', 12, 12, 'black', [], [])
dev_disp_text ('Press Run (F5) to continue', 'window', 'bottom', 'right', 'black', [], [])
stop ()
* Continue to calculate small regions
* Return the complement of a region
complement (LargeDilation, NotLarge)
reduce_domain (Image, NotLarge, ParticlesRed)
mean_image (ParticlesRed, Mean, 31, 31)
* Segment the image using a local threshold
dyn_threshold (ParticlesRed, Mean, SmallRaw, 3, 'light')
opening_circle (SmallRaw, Small, 2.5)
connection (Small, SmallConnection)
dev_display (Image)
dev_set_colored (12)
dev_display (SmallConnection)
dev_disp_text ('Extracted small particles', 'window', 12, 12, 'black', [], [])
dev_disp_text ('Press Run (F5) to continue', 'window', 'bottom', 'right', 'black', [], [])
stop ()
* Continue to select several regions and to get information
dev_set_color ('green')
dev_display (Image)
dev_set_draw ('margin')
dev_display (SmallConnection)
Button := 1
* Define limits for the displayed message at the end of the while-loop.
MaxRow := 450
MaxColumn := 440
MinRow := 40
MinColumn := 100
while (Button == 1)
    dev_disp_text (['Select object with left mouse button','Right button to quit'], 'window', 12, 12, 'black', 'box_color', '#fce9d4dd')
    dev_set_color ('green')
    get_mbutton (WindowID, Row, Column, Button)
    dev_display (Image)
    dev_display (SmallConnection)
    dev_set_color ('red')
    select_region_point (SmallConnection, SmallSingle, Row, Column)
    dev_display (SmallSingle)
    count_obj (SmallSingle, NumSingle)
    if (NumSingle == 1)
        intensity (SmallSingle, Image, MeanGray, DeviationGray)
        area_center (SmallSingle, Area, Row, Column)
        * Limit the message so that it is displayed entirely inside the graphics window.
        if (Row > MaxRow)
            Row := MaxRow
        endif
        if (Column > MaxColumn)
            Column := MaxColumn
        endif
        if (Row < MinRow)
            Row := MinRow
        endif
        if (Column < MinColumn)
            Column := MinColumn
        endif
        dev_disp_text (['Area = ' + Area,'Intensity = ' + MeanGray$'.3'], 'image', Row + 10, Column - 90, 'black', 'box_color', '#fce9d4dd')
    endif
endwhile
dev_set_line_width (1)
dev_update_on ()
Extracting Forest Features from Color Infrared Image

本示例的任務是在圖中所示的彩色紅外圖像中檢測不同的對象類別:樹(針恭弘=叶 恭弘和落恭弘=叶 恭弘),草地和道路

圖像數據是彩色紅外圖像,由於其特定的顏色,可以非常輕鬆地提取道路。需要做到那樣的話,要將多通道圖像拆分為單通道。

read_image (Forest, 'forest_air1')
decompose3 (Forest, Red, Green, Blue)
threshold (Blue, BlueBright, 80, 255)
connection (BlueBright, BlueBrightConnection)
select_shape (BlueBrightConnection, Path, 'area', 'and', 100, 100000000)

山毛櫸樹根據其在紅色通道中的強度和最小大小進行分割

threshold (Red, RedBright, 120, 255)
connection (RedBright, RedBrightConnection)
select_shape (RedBrightConnection, RedBrightBig, 'area', 'and', 1500, 10000000)
closing_circle (RedBrightBig, RedBrightClosing, 7.5)
opening_circle (RedBrightClosing, RedBrightOpening, 9.5)
connection (RedBrightOpening, RedBrightOpeningConnection)
select_shape (RedBrightOpeningConnection, BeechBig, 'area', 'and', 1000, 100000000)
select_gray (BeechBig, Blue, Beech, 'mean', 'and', 0, 59)

草地具有相似的光譜特性,但亮度略高

union1 (Beech, BeechUnion)
complement (BeechUnion, NotBeech)
difference (NotBeech, Path, NotBeechNotPath)
reduce_domain (Red, NotBeechNotPath, NotBeechNotPathRed)
threshold (NotBeechNotPathRed, BrightRest, 150, 255)
connection (BrightRest, BrightRestConnection)
select_shape (BrightRestConnection, Meadow, 'area', 'and', 500, 1000000)

使用分水嶺方法提取針恭弘=叶 恭弘樹,並在盆地內部增加閾值

union2 (Path, RedBrightClosing, BeechPath)
smooth_image (Red, RedGauss, 'gauss', 4.0)
invert_image (RedGauss, Invert)
watersheds (Invert, SpruceRed, Watersheds)
select_shape (SpruceRed, SpruceRedLarge, 'area', 'and', 100, 5000)
select_gray (SpruceRedLarge, Red, SpruceRedInitial, 'max', 'and', 100, 200)
gen_empty_obj (LocalThresh)
count_obj (SpruceRedInitial, NumSpruce)
dev_update_var ('off')
dev_update_pc ('off')
for i := 1 to NumSpruce by 1
    select_obj (SpruceRedInitial, SingleSpruce, i)
    min_max_gray (SingleSpruce, Red, 50, Min, Max, Range)
    reduce_domain (Red, SingleSpruce, SingleSpruceRed)
    threshold (SingleSpruceRed, SingleSpruceBright, Min, 255)
    connection (SingleSpruceBright, SingleSpruceBrightCon)
    select_shape_std (SingleSpruceBrightCon, MaxAreaSpruce, 'max_area', 70)
    concat_obj (MaxAreaSpruce, LocalThresh, LocalThresh)
endfor
opening_circle (LocalThresh, FinalSpruce, 1.5)

源程序

dev_close_window ()
dev_update_window ('off')
read_image (Forest, 'forest_air1')
get_image_size (Forest, Width, Height)
dev_open_window (0, 0, Width, Height, 'black', WindowHandle)
decompose3 (Forest, Red, Green, Blue)
dev_display (Red)
threshold (Blue, BlueBright, 80, 255)
connection (BlueBright, BlueBrightConnection)
select_shape (BlueBrightConnection, Path, 'area', 'and', 100, 100000000)
dev_set_color ('red')
dev_set_draw ('margin')
dev_display (Path)
disp_continue_message (WindowHandle, 'black', 'true')
stop ()
threshold (Red, RedBright, 120, 255)
connection (RedBright, RedBrightConnection)
select_shape (RedBrightConnection, RedBrightBig, 'area', 'and', 1500, 10000000)
closing_circle (RedBrightBig, RedBrightClosing, 7.5)
opening_circle (RedBrightClosing, RedBrightOpening, 9.5)
connection (RedBrightOpening, RedBrightOpeningConnection)
select_shape (RedBrightOpeningConnection, BeechBig, 'area', 'and', 1000, 100000000)
select_gray (BeechBig, Blue, Beech, 'mean', 'and', 0, 59)
dev_display (Red)
dev_display (Beech)
disp_continue_message (WindowHandle, 'black', 'true')
stop ()
union1 (Beech, BeechUnion)
complement (BeechUnion, NotBeech)
difference (NotBeech, Path, NotBeechNotPath)
reduce_domain (Red, NotBeechNotPath, NotBeechNotPathRed)
threshold (NotBeechNotPathRed, BrightRest, 150, 255)
connection (BrightRest, BrightRestConnection)
select_shape (BrightRestConnection, Meadow, 'area', 'and', 500, 1000000)
dev_display (Red)
dev_display (Meadow)
disp_continue_message (WindowHandle, 'black', 'true')
stop ()
union2 (Path, RedBrightClosing, BeechPath)
smooth_image (Red, RedGauss, 'gauss', 4.0)
invert_image (RedGauss, Invert)
watersheds (Invert, SpruceRed, Watersheds)
select_shape (SpruceRed, SpruceRedLarge, 'area', 'and', 100, 5000)
select_gray (SpruceRedLarge, Red, SpruceRedInitial, 'max', 'and', 100, 200)
gen_empty_obj (LocalThresh)
count_obj (SpruceRedInitial, NumSpruce)
dev_update_var ('off')
dev_update_pc ('off')
for i := 1 to NumSpruce by 1
    select_obj (SpruceRedInitial, SingleSpruce, i)
    min_max_gray (SingleSpruce, Red, 50, Min, Max, Range)
    reduce_domain (Red, SingleSpruce, SingleSpruceRed)
    threshold (SingleSpruceRed, SingleSpruceBright, Min, 255)
    connection (SingleSpruceBright, SingleSpruceBrightCon)
    select_shape_std (SingleSpruceBrightCon, MaxAreaSpruce, 'max_area', 70)
    concat_obj (MaxAreaSpruce, LocalThresh, LocalThresh)
endfor
opening_circle (LocalThresh, FinalSpruce, 1.5)
dev_set_line_width (2)
dev_set_color ('red')
dev_display (Red)
dev_display (FinalSpruce)
dev_set_color ('green')
dev_display (Beech)
dev_set_color ('yellow')
dev_display (Meadow)
Checking a Boundary for Fins

本示例的任務是檢查塑料零件的外邊界。在這種情況下,某些對象會显示鰭

程序首先提取背景區域(鰭显示為壓痕)

binary_threshold (Fin, Background, 'max_separability', 'light', UsedThreshold)

然後使用形態學運算符關閉背景區域中的壓痕

 closing_circle (Background, ClosedBackground, 250)

封閉區域與原始區域之間的顯著差異是鰭

 difference (ClosedBackground, Background, RegionDifference)
 opening_rectangle1 (RegionDifference, FinRegion, 5, 5)

源程序

* fin.hdev: Detection of a fin
* 
dev_update_window ('off')
read_image (Fins, 'fin' + [1:3])
get_image_size (Fins, Width, Height)
dev_close_window ()
dev_open_window (0, 0, Width[0], Height[0], 'black', WindowID)
set_display_font (WindowID, 14, 'mono', 'true', 'false')
for I := 1 to 3 by 1
    select_obj (Fins, Fin, I)
    dev_display (Fin)
    binary_threshold (Fin, Background, 'max_separability', 'light', UsedThreshold)
    dev_set_color ('blue')
    dev_set_draw ('margin')
    dev_set_line_width (4)
    dev_display (Background)
    disp_continue_message (WindowID, 'black', 'true')
    stop ()
    closing_circle (Background, ClosedBackground, 250)
    dev_set_color ('green')
    dev_display (ClosedBackground)
    disp_continue_message (WindowID, 'black', 'true')
    stop ()
    difference (ClosedBackground, Background, RegionDifference)
    opening_rectangle1 (RegionDifference, FinRegion, 5, 5)
    dev_display (Fin)
    dev_set_color ('red')
    dev_display (FinRegion)
    area_center (FinRegion, FinArea, Row, Column)
    if (I < 3)
        disp_continue_message (WindowID, 'black', 'true')
        stop ()
    endif
endfor
Bonding Balls

本示例的任務是檢查圖中PCB板所示的球形鍵合直徑

球形鍵的提取有兩個步驟:首先,通過分割亮區來定位裸片,然後將它們轉換為最小的矩形

threshold (Bond, Bright, 100, 255)
shape_trans (Bright, Die, 'rectangle2')

現在,使用reduce_domain處理模具內部的區域。在此ROI中,程序檢查與線材相對應的深色區域

reduce_domain (Bond, Die, DieGrey)
threshold (DieGrey, Wires, 0, 50)
fill_up_shape (Wires, WiresFilled, 'area', 1, 100)

刪除不相關的結構,並按預定順序排列鍵提取所需的特徵

opening_circle (WiresFilled, Balls, 15.5)
connection (Balls, SingleBalls)
select_shape (SingleBalls, IntermediateBalls, 'circularity', 'and', 0.85, 1.0)
sort_region (IntermediateBalls, FinalBalls, 'first_point', 'true', 'column')
smallest_circle (FinalBalls, Row, Column, Radius)

源代碼

* ball.hdev: Inspection of Ball Bonding
* 
dev_update_window ('off')
dev_close_window ()
dev_open_window (0, 0, 728, 512, 'black', WindowID)
read_image (Bond, 'die/die_03')
dev_display (Bond)
set_display_font (WindowID, 14, 'mono', 'true', 'false')
disp_continue_message (WindowID, 'black', 'true')
stop ()
threshold (Bond, Bright, 100, 255)
shape_trans (Bright, Die, 'rectangle2')
dev_set_color ('green')
dev_set_line_width (3)
dev_set_draw ('margin')
dev_display (Die)
disp_continue_message (WindowID, 'black', 'true')
stop ()
reduce_domain (Bond, Die, DieGrey)
threshold (DieGrey, Wires, 0, 50)
fill_up_shape (Wires, WiresFilled, 'area', 1, 100)
dev_display (Bond)
dev_set_draw ('fill')
dev_set_color ('red')
dev_display (WiresFilled)
disp_continue_message (WindowID, 'black', 'true')
stop ()
opening_circle (WiresFilled, Balls, 15.5)
dev_set_color ('green')
dev_display (Balls)
disp_continue_message (WindowID, 'black', 'true')
stop ()
connection (Balls, SingleBalls)
select_shape (SingleBalls, IntermediateBalls, 'circularity', 'and', 0.85, 1.0)
sort_region (IntermediateBalls, FinalBalls, 'first_point', 'true', 'column')
dev_display (Bond)
dev_set_colored (12)
dev_display (FinalBalls)
disp_continue_message (WindowID, 'black', 'true')
stop ()
smallest_circle (FinalBalls, Row, Column, Radius)
NumBalls := |Radius|
Diameter := 2 * Radius
meanDiameter := mean(Diameter)
minDiameter := min(Diameter)
dev_display (Bond)
disp_circle (WindowID, Row, Column, Radius)
dev_set_color ('white')
disp_message (WindowID, 'D: ' + Diameter$'.4', 'image', Row - 2 * Radius, Column, 'white', 'false')
dev_update_window ('on')
Surface Scratches

本示例檢測金屬表面上的划痕
分割的主要困難是背景不均勻以及划痕是薄的結構。可以使用局部閾值解決這兩個問題。即算子mean_image和dyn_threshold,在connection后,將小對象(主要是噪聲)移除

mean_image (Image, ImageMean, 7, 7)
dyn_threshold (Image, ImageMean, DarkPixels, 5, 'dark')
connection (DarkPixels, ConnectedRegions)
select_shape (ConnectedRegions, SelectedRegions, 'area', 'and', 10, 1000)

選擇的一部分是划痕,但是如果我們仔細觀察,就會發現它們被部分分割了。為了解決這個問題,我們將所有分割部分再次合併到一個大區域中。通過應用dilation_circle將具有給定最大距離的物體組合在一起。最終獲得正確形狀的划痕。由於膨脹的緣故,使用skeleton將形狀變薄到一個像素的寬度

union1 (SelectedRegions, RegionUnion)
dilation_circle (RegionUnion, RegionDilation, 3.5)
skeleton (RegionDilation, Skeleton)
connection (Skeleton, Errors)

最後一步是區分表面上的小點和划痕。這是通過使用大小作為特徵的select_shape實現的。

select_shape (Errors, Scratches, 'area', 'and', 50, 10000)
select_shape (Errors, Dots, 'area', 'and', 1, 50)

源代碼

* This programm shows the extraction of surface scratches via
* local thresholding and morphological post-processing
* 
dev_update_off ()
dev_close_window ()
* 
* Step 1: Acquire image
* 
read_image (Image, 'surface_scratch')
get_image_size (Image, Width, Height)
dev_open_window_fit_image (Image, 0, 0, Width, Width, WindowID)
set_display_font (WindowID, 16, 'mono', 'true', 'false')
dev_set_draw ('margin')
dev_set_line_width (4)
dev_display (Image)
Message := 'This program shows the extraction of'
Message[1] := 'surface scratches via local thresholding'
Message[2] := 'and morphological post-processing'
disp_message (WindowID, Message, 'window', 12, 12, 'black', 'true')
disp_continue_message (WindowID, 'black', 'true')
stop ()
* 
* Step 2: Segment image
* 
* Using a local threshold
mean_image (Image, ImageMean, 7, 7)
dyn_threshold (Image, ImageMean, DarkPixels, 5, 'dark')
* 
* Extract connected components
connection (DarkPixels, ConnectedRegions)
dev_set_colored (12)
dev_display (Image)
dev_display (ConnectedRegions)
Message := 'Connected components after image segmentation'
Message[1] := 'using a local threshold.'
disp_message (WindowID, Message, 'window', 12, 12, 'black', 'true')
disp_continue_message (WindowID, 'black', 'true')
stop ()
* 
* Step 3: Process regions
* 
* Select large regions
select_shape (ConnectedRegions, SelectedRegions, 'area', 'and', 10, 1000)
dev_display (Image)
dev_display (SelectedRegions)
disp_message (WindowID, 'Large Regions', 'window', 12, 12, 'black', 'true')
disp_continue_message (WindowID, 'black', 'true')
stop ()
* 
* Visualize fractioned scratch
open_zoom_window (0, round(Width / 2), 2, 303, 137, 496, 3, WindowHandleZoom)
dev_set_color ('blue')
dev_display (Image)
dev_display (SelectedRegions)
set_display_font (WindowHandleZoom, 16, 'mono', 'true', 'false')
disp_message (WindowHandleZoom, 'Fractioned scratches', 'window', 12, 12, 'black', 'true')
disp_continue_message (WindowHandleZoom, 'black', 'true')
stop ()
* 
* Merge fractioned scratches via morphology
union1 (SelectedRegions, RegionUnion)
dilation_circle (RegionUnion, RegionDilation, 3.5)
dev_display (Image)
dev_display (RegionDilation)
Message := 'Region of the scratches after dilation'
disp_message (WindowHandleZoom, Message, 'window', 12, 12, 'black', 'true')
disp_continue_message (WindowHandleZoom, 'black', 'true')
stop ()
skeleton (RegionDilation, Skeleton)
connection (Skeleton, Errors)
dev_set_colored (12)
dev_display (Image)
dev_display (Errors)
Message := 'Fractioned scratches merged via morphology'
disp_message (WindowHandleZoom, Message, 'window', 12, 12, 'black', 'true')
disp_continue_message (WindowHandleZoom, 'black', 'true')
stop ()
* 
* Distinguish small and large scratches
close_zoom_window (WindowHandleZoom, Width, Height)
select_shape (Errors, Scratches, 'area', 'and', 50, 10000)
select_shape (Errors, Dots, 'area', 'and', 1, 50)
dev_display (Image)
dev_set_color ('red')
dev_display (Scratches)
dev_set_color ('blue')
dev_display (Dots)
Message := 'Extracted surface scratches'
Message[1] := 'Not categorized as scratches'
disp_message (WindowID, Message, 'window', 440, 310, ['red','blue'], 'true')

靈感來源於官方文檔

本站聲明:網站內容來源於博客園,如有侵權,請聯繫我們,我們將及時處理

【其他文章推薦】

網頁設計公司推薦不同的風格,搶佔消費者視覺第一線

※廣告預算用在刀口上,台北網頁設計公司幫您達到更多曝光效益

※自行創業缺乏曝光? 網頁設計幫您第一時間規劃公司的形象門面

南投搬家公司費用需注意的眉眉角角,別等搬了再說!

新北清潔公司,居家、辦公、裝潢細清專業服務

油價大跌 陸新能源汽車銷售目標恐難達成

國際原油每桶已跌破 55 美元,這對大陸正在推動新能源汽車恐怕將踢到鐵板,尤其是明年銷售 50 萬輛的目標很難達陣。大陸正致力推動的新能源政策,也將出現減速的阻力,包括太陽能等替代能源產業,都在這次國際油價重跌後,面臨無以為繼的結果。   《南方周末》報導,國際油價下跌,新能源汽車首當其衝,其中以中國電動車龍頭企業比亞迪受傷最重,原本就賣不動的電動車,在油價直直落後,不少消費者根本對電動車無感。   據悉,工信部副部長蘇波除到比亞迪考察新能源汽車發展和推廣情況外,更召集相關部會舉行節能與新能源汽車產業發展部際聯席會議聯絡員會議,除了發改委、科技部、財政部等 18 個部際聯席會議成員單位,還邀請國管局、國土資源部參加,規模空前,顯見中國政府也預見新能源汽車受油價影響,政府訂定的銷售目標恐難以達陣。  

本站聲明:網站內容來源於EnergyTrend https://www.energytrend.com.tw/ev/,如有侵權,請聯繫我們,我們將及時處理
【其他文章推薦】

USB CONNECTOR掌控什麼技術要點? 帶您認識其相關發展及效能

台北網頁設計公司這麼多該如何選擇?

※智慧手機時代的來臨,RWD網頁設計為架站首選

※評比南投搬家公司費用收費行情懶人包大公開

※幫你省時又省力,新北清潔一流服務好口碑

※回頭車貨運收費標準

Flutter開發初探

目前跨端開發比較熱門的就是 React NativeFlutter 了,到底該選哪門技術似乎也快成了大前端圈的一個熱門話題。對於web前端來說,基於web生態的 React Native 應該是一個更加順暢而自然的選擇;但 Flutter 讓人動心的地方就是高性能和 跨端UI一致性。而React Native 發展不太明朗和 Flutter 越發成熟的走勢對比促使我從觀望的心態轉為加入 Flutter

這裏主要就是記錄一下學習Flutter的一些感想和看法:

  • 包管理
  • 布局和樣式
  • json
  • 狀態管理

包管理

pubspec.yaml 文件的作用類似於 npmpackage.json ,而yaml格式也比json方便。但是不能用命令行自動安裝包卻讓習慣了npm的我覺得麻煩。因為Flutter 安裝依賴包是這麼一個流程:

  1. 打開pub.dev網站;
  2. 搜索需要的包,得到包的名稱和版本;
  3. 把包名稱和版本填入pubspec.yaml,最後才開始下載包。

我覺得應該直接命令行安裝包,讓它幫我們下載,名稱版本自動寫入pubspec.yaml。如果沒有指定版本就是默認下載最新版本,因為很多時候我們並不想知道版本號,給我個能用的最新的版本號就ok了。

布局和樣式

就和很多人想的一樣,為什麼不使用 jsx 或者 xml 格式進行布局,因為基於代碼的方式看起來太不直觀了,之所以這樣聽說主要是能更方便的和Dart的hot reload特性配合使用,代碼改動能立刻反映布局變化。但我還是期待有適配轉化 DSL 的框架出現。

Flutter一切都是widget,但是連很多屬性都當成widget 這就讓人有些看不明白了,比如 CenterAlignPadding,為什麼不把常用的樣式屬性都加入到布局組件裏面呢?這導致出現了這麼一種情況:嵌套嚴重,一個很簡單的功能需要層層嵌套才能實現,而且樣式也不能方便的復用。目前比較合理的建議就是適當抽取齣子組件減少嵌套。

Json

Dart 作為強類型的語言,一切皆是對象。Dart要方便操作json就得把json轉化為對象,這就意味着每用到一個json,就需要定義一個對應的類,這也是強類型語言的通病了。這絕對讓人很懷念 js/ts 這種對json操作非常自然順暢的弱類型/函數式語言。當然也不是沒有妥協的解決方案,比較方便的就是 json_model,Flutter實戰作者寫的一個工具庫,步驟也簡單:

  1. 在工程根目錄下創建一個名為 “jsons” 的目錄;
  2. 創建或拷貝Json文件到”jsons” 目錄中 ;
  3. 運行 pub run json_model (Dart VM工程)or flutter packages pub run json_model(Flutter中) 命令生成Dart model類,生成的文件默認在”lib/models”目錄下

狀態管理

Flutter 使用initStatesetState方法設置widget狀態,原理類似React。當然這隻是widget內部控制狀態用的,跨組件通信還是需要其他方案的。官方推薦是使用Provider,使用下來中規中矩吧,當然還可以使用大名鼎鼎的 Redux 以及 mbox。不過Redux本身就以過多的樣板代碼而出名,寫React的時候就不喜歡用,hooks 出來后就果斷就放棄Redux了。hooks才是真香啊,Flutter什麼時候才支持類似的函數式狀態管理方案呢?

總結

說了這麼多,本質就是為什麼 Flutter 不向以 React 為代表的 web 生態看齊?更大的原因是Flutter的很多理念和開發模式其實遠遠落後於 React 。這也是為什麼習慣 react/vue 的 web前端 對於Flutter 感覺很彆扭不順手的原因了。

本站聲明:網站內容來源於博客園,如有侵權,請聯繫我們,我們將及時處理
【其他文章推薦】

USB CONNECTOR掌控什麼技術要點? 帶您認識其相關發展及效能

台北網頁設計公司這麼多該如何選擇?

※智慧手機時代的來臨,RWD網頁設計為架站首選

※評比南投搬家公司費用收費行情懶人包大公開

※幫你省時又省力,新北清潔一流服務好口碑

※回頭車貨運收費標準