Java多線程系列文章是Java多線程的詳解介紹,對多線程還不熟悉的同學可以先去看一下我的這篇博客,這篇博客從宏觀層面介紹了多線程的整體概況,接下來的幾篇文章是對多線程的深入剖析。
多線程的常用方法
1、currentThread()方法:
介紹:currentThread()方法可返回該代碼正在被哪個線程調用的信息。
示例:
例1:
public class Test01 {

	public static void main(String[] args) {
		System.out.println(Thread.currentThread().getName());
	}

}

結果:
main
結果說明,main方法被名為main的線程調用
例2:
class Mythread extends Thread{

	public Mythread() {
		System.out.println("構造方法的打印:"+Thread.currentThread().getName());
	}

	@Override
	public void run() {
		System.out.println("run方法的打印:"+Thread.currentThread().getName());
	}
}

public class Test01 {

	public static void main(String[] args) {
		Mythread t=new Mythread();
		t.start();//①
	}

}

結果:
構造方法的打印:main
run方法的打印:Thread-0
從結果可知:Mythread的構造方法是被main線程調用的,而run方法是被名稱為Thread-0的線程調用的,run方法是線程自動調用的
現在我們將①處的代碼改為t.run(),現在的輸出結果如下:
構造方法的打印:main
run方法的打印:main
從結果中我們可以看到兩次的結果显示都是main線程調用了方法,因為當你使用t.start()方法的時候是線程自動調用的run()方法,所以輸出的是Thread-0,當你直接調用run()方法時,和調用普通方法沒有什麼區別,所以是main線程調用run()
2、isAlive()方法:
介紹:isAlive()方法的功能是判斷當前的線程是否處於活動狀態
示例:
例1:
class Mythread extends Thread{

	@Override
	public void run() {
		System.out.println("run =="+this.isAlive());
	}

}

public class Test01 {

	public static void main(String[] args) {
		Mythread thread=new Mythread();
		System.out.println("begin =="+thread.isAlive());//①
		thread.start();//②
		System.out.println("end =="+thread.isAlive());//③
	}

}

結果:
begin ==false
end ==true
run ==true
方法isAlive()的作用是測試線程是否處於活動狀態。那麼什麼情況下是活動狀態呢?活動狀態就是線程已經啟動且尚未停止。線程處於正在運行或準備開始運行的狀態,就認為線程是存活的
①處代碼的結果為false,因為此時線程還未啟動;
②處代碼調用了run()方法輸出結果為run ==true,此時線程處於活動狀態;
③處代碼的結果為true,有的同學看到這個輸出可能會不理解,不是說線程處於活動狀態isAlive()方法的結果才是true,現在程序都已經運行結束了為什麼還是true?這裏的輸出結果是不確定的,我們再來看下面一段代碼
我們將例1中的代碼稍做修改,代碼如下:
public class Test01 {

	public static void main(String[] args) throws InterruptedException {
		Mythread thread=new Mythread();
		System.out.println("begin =="+thread.isAlive());//①
		thread.start();//②
		Thread.sleep(1000);//這裏加了一行代碼,讓當前線程沉睡1秒
		System.out.println("end =="+thread.isAlive());//③
	}

}

結果:
begin ==false
run ==true
end ==false
現在我們看到③處的代碼結果為end ==false,因為thread對象已經在1秒內執行完畢,而上面代碼輸出結果為true是因為thread線程未執行完畢。
3、sleep()方法:
介紹:
方法sleep()的作用是在指定的毫秒數內讓當前“正在執行的線程”休眠(暫停執行),這個“正在執行的線程”是指this.currentThread()返回的線程。
示例:
class Mythread extends Thread{

	@Override
	public void run() {

		try {
			System.out.println("run threadName="+this.currentThread().getName()+" begin");
			Thread.sleep(2000);
			System.out.println("run threadName="+this.currentThread().getName()+" end");

		} catch (InterruptedException e) {
			// TODO Auto-generated catch block
			e.printStackTrace();
		}

	}

}

public class Test01 {

	public static void main(String[] args) throws InterruptedException {
		Mythread thread=new Mythread();
		System.out.println("begin ="+System.currentTimeMillis());
		thread.run();//①
		System.out.println("end ="+System.currentTimeMillis());
	}

}

結果:
begin =1574660731663
run threadName=main begin
run threadName=main end
end =1574660733665
從結果中可以看出main線程暫停了2秒(因為這裏調用的是thread.run())
下面我們將①處的代碼改成thread.start(),再來看下運行結果:
begin =1574661491412
end =1574661491412
run threadName=Thread-0 begin
run threadName=Thread-0 end
由於main線程與thread線程是異步執行的,所以首先打印的信息為begin和end,而thread線程是隨後運行的,在最後兩行打印run begin和run end的信息。
4、getId()方法:
介紹:getId()方法的作用是取得線程的唯一標識
示例:
public class Test01 {

	public static void main(String[] args) throws InterruptedException {
		Thread thread=Thread.currentThread();
		System.out.println(thread.getName()+" "+thread.getId());
	}

}

結果:main 1
從運行結果可以看出,當前執行代碼的線程名稱是main,線程id值為1
5、停止線程:
介紹:停止線程是在多線程開發時很重要的技術點,掌握此技術可以對線程的停止進行有效的處理。停止線程在Java語言中並不像break語句那樣乾脆,需要一些技巧性的處理。
在java中有三種方法可以停止線程
- 使用退出標誌,讓線程正常退出,也就是當run方法執行完之後終止
- 使用stop方法強制終止線程,但是不推薦使用,因為stop和suspend及resume一樣,是java廢棄的方法
- 使用interrupt方法中斷線程(推薦使用)
示例:
例1:
class Mythread extends Thread{

	@Override
	public void run() {

		for(int i=0;i<5000;i++) {
			System.out.println("i="+(i+1));
		}
	}

}

public class Test01 {

	public static void main(String[] args) throws InterruptedException {
		Mythread thread=new Mythread();
		thread.start();
		Thread.sleep(2000);
		thread.interrupt();
	}

}
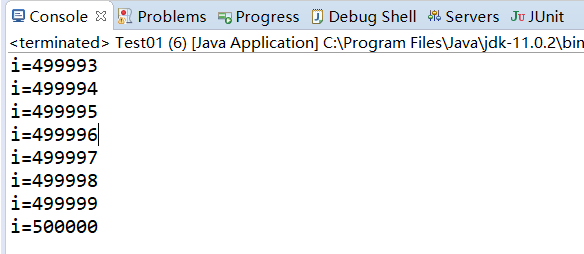
運行結果:
從運行結果我們可以看出最後i=500000,調用interrupt方法沒有停止線程,那麼該如何停止線程呢?
在介紹如何停止線程時,我們先來介紹一下如何判斷線程是否處於停止狀態
Thread類中提供了兩種方法用來判斷線程是否停止:
1、this.interrupted():測試當前線程是否已經中斷,執行后具有將狀態標誌清除為false的功能
public static boolean interrupted() {
        return currentThread().isInterrupted(true);
}
2、this.isInterrupted():測試線程Thread對象是否已經中斷,但是不清除狀態標誌
public boolean isInterrupted() {
        return isInterrupted(false);
}
讀者可以仔細觀看一下這兩個方法的聲明有什麼不同?
例2:
class Mythread extends Thread{

	@Override
	public void run() {

		for(int i=0;i<5000;i++) {
			System.out.println("i="+(i+1));
		}
	}

}

public class Test01 {

	public static void main(String[] args) throws InterruptedException {
		Mythread thread=new Mythread();
		thread.start();
		Thread.sleep(1000);
		thread.interrupt();
		System.out.println("是否停止1?="+thread.interrupted());
		System.out.println("是否停止2?="+thread.interrupted());
		System.out.println("end!");
	}

}
結果:
輸出結果显示調用了thread.interrupt()方法后線程並未停止,這也就證明了interrupted()方法的解釋:測試當前線程是否已經中斷。這個當前線程是main,它從未斷過,所以打印的結果是兩個false。
如果想讓main線程結束該怎麼做?
將main方法改成如下:
public class Test01 {

	public static void main(String[] args) throws InterruptedException {
		Thread.currentThread().interrupt();
		System.out.println("是否停止1?="+Thread.interrupted());
		System.out.println("是否停止2?="+Thread.interrupted());
		System.out.println("end!");
	}

}

結果:
是否停止1?=true
是否停止2?=false
end!
從輸出結果我們可以看出,方法interrupted()的確判斷出當前線程是否是停止狀態。但為什麼第2個值是false?
查看一下官方文檔的介紹:
測試當前線程是否已經中斷。線程的中斷狀態由該方法清除。換句話說,如果連續兩次調用該方法,則第二次調用將返回false(在第一次調用已清除了其中斷狀態之後,且第二次調用檢驗完中斷狀態前,當前線程再次中斷的情況除外)。
文檔中說明的非常清楚,interrupted()方法具有清除狀態的功能,所以第二次調用interrupted方法返回的值時false。
下面我們來看一下isInterrupted()方法,將main方法改成如下代碼:
public static void main(String[] args) throws InterruptedException {
		Mythread thread=new Mythread();
		thread.start();
		thread.interrupt();
		Thread.sleep(1000);
		System.out.println("是否停止1?="+thread.isInterrupted());
		System.out.println("是否停止2?="+thread.isInterrupted());
		System.out.println("end");
}
結果:

是否停止1?=true
是否停止2?=true
end
從結果可以看出,方法isInterrrupted()並未清除狀態,所以結果為兩個true。
例3:在沉睡中停止
當線程調用sleep()方法后再調用interrupt()方法後會有什麼結果:
class Mythread extends Thread{

	@Override
	public void run() {

		try {
			System.out.println("run begin");
			Thread.sleep(200000);
			System.out.println("run end");
		} catch (InterruptedException e) {
			System.out.println("在沉睡中被停止,進入catch!"+this.isInterrupted());
			e.printStackTrace();
		}
	}

}

public class Test01 {

	public static void main(String[] args) throws InterruptedException {
		try {
			Mythread thread=new Mythread();
			thread.start();
			Thread.sleep(200);
			thread.interrupt();
		}catch(Exception e) {
			System.out.println("main catch");
			e.printStackTrace();
		}
		System.out.println("end!");
	}

}
6、暫停線程:
暫停線程意味着此線程還可以恢復運行。在java多線程中,可以使用suspend()方法暫停線程,使用resume()方法恢複線程的執行
例1:
class Mythread extends Thread{

	private long i=0;
	public long getI() {
		return i;
	}

    public void setI(long i) {
		this.i = i;
	}

	@Override
	public void run() {
		while(true) {
			i++;
		}
	}

}

public class Test01 {

	public static void main(String[] args) throws InterruptedException {

		Mythread thread=new Mythread();
		thread.start();
		Thread.sleep(5000);
		//A段
		thread.suspend();
		System.out.println("A= "+System.currentTimeMillis()+" i="+thread.getI());
		Thread.sleep(5000);
		System.out.println("A= "+System.currentTimeMillis()+" i="+thread.getI());

		//B段
		thread.resume();
		Thread.sleep(5000);

		//C段
		thread.suspend();
		System.out.println("B= "+System.currentTimeMillis()+" i="+thread.getI());
		Thread.sleep(5000);
		System.out.println("B= "+System.currentTimeMillis()+" i="+thread.getI());

	}

}
結果:
從控制台打印的時間上來看,線程的確被暫停了,而且還可以恢復成運行狀態。
7、yield方法:
介紹:yield()方法的作用是放棄當前的CPU資源,將它讓給其他的任務去佔用CPU執行時間。但放棄的時間不確定,有可能剛剛放棄,馬上又獲得CPU時間片
示例:
class Mythread extends Thread{

	@Override
	public void run() {
		long beginTime=System.currentTimeMillis();
		int count=0;
		for(int i=0;i<500000;i++) {
               //Thread.yield();①
			count=count+(i+1);
		}
		long endTime=System.currentTimeMillis();
		System.out.println("用時:"+(endTime-beginTime)+"毫秒!");
	}

}

public class Test01 {

	public static void main(String[] args) throws InterruptedException {
		Mythread thread=new Mythread();
		thread.start();
	}

}

結果:用時:2毫秒!
現在將①處的代碼取消註釋,我們再來看一下運行結果:
用時:213毫秒!
將CPU讓給其他資源導致速度變慢
8、線程優先級:
介紹:
在操作系統中,線程可以劃分優先級,優先級較高的線程得到的CPU資源較多,也就是CPU優先執行優先級較高的線程對象中的任務。
設置線程優先級有助於幫“線程規劃器”確定在下一次選擇哪一個線程來優先執行。
設置線程的優先級使用setPriority()方法,此方法在JDK的源代碼如下:
public final void setPriority(int newPriority) {
        ThreadGroup g;
        checkAccess();
        if (newPriority > MAX_PRIORITY || newPriority < MIN_PRIORITY) {
            throw new IllegalArgumentException();
        }
        if((g = getThreadGroup()) != null) {
            if (newPriority > g.getMaxPriority()) {
                newPriority = g.getMaxPriority();
            }
            setPriority0(priority = newPriority);
        }
}
在Java中,線程的優先級為1-10這10個等級,如果小於1或大於10,則JDK拋出異常throw new IllegalArgumentException()。
通常高優先級的線程總是先執行完,但是並不是一定的,高優先級和低優先級的線程會交替進行,高優先級執行的次數多一些
線程優先級的繼承特性:
在Java中,線程的優先級具有繼承性,比如A線程啟動B線程,則B線程的優先級與A是一樣的。
class Mythread2 extends Thread{
	@Override
	public void run() {
		System.out.println("Mythread2 run priority="+this.getPriority());
	}
}


class Mythread1 extends Thread{

	@Override
	public void run() {
		System.out.println("Mythread run priority="+this.getPriority());
		Mythread2 thread2=new Mythread2();
		thread2.start();
	}

}

public class Test01 {

	public static void main(String[] args) throws InterruptedException {

		System.out.println("main thread begin priority="+Thread.currentThread().getPriority());
    	        //Thread.currentThread().setPriority(6);①
		System.out.println("main thread end priority="+Thread.currentThread().getPriority());
		Mythread1 thread1=new Mythread1();
		thread1.start();
	}

}

結果:
main thread begin priority=5
main thread end priority=5
Mythread run priority=5
Mythread2 run priority=5
可以看到上面幾個線程的優先級都為5
現在將①處的代碼註釋掉后的結果是:
main thread begin priority=5
main thread end priority=6
Mythread run priority=6
Mythread2 run priority=6
優先級被更改后再繼續繼承
9、守護線程:
在java中有兩種線程,一種是用戶線程,另一種是守護線程。
守護線程是一種特殊的線程,它的特性有“陪伴”的含義,當進程中不存在非守護線程了,則守護線程自動銷毀。典型的守護線程就是垃圾回收線程,當進程中沒有非守護線程了,則垃圾回收線程也就沒有存在的必要了,自動銷毀。用個比較通俗的比喻來解釋一下:“守護線程”:任何一個守護線程都是整個JVM中所有非守護線程的“保姆”,只要當前JVM實例中存在任何一個非守護線程沒有結束,守護線程就在工作,只有當最後一個非守護線程結束時,守護線程才隨着JVM一同結束工作。Daemon的作用是為其他線程的運行提供便利服務,守護線程最典型的應用就是GC(垃圾回收器),它就是一個很稱職的守護者。
class Mythread extends Thread{

	private int i=0;


	@Override
	public void run() {

		try {
			while(true) {
				i++;
				System.out.println("i="+(i));
				Thread.sleep(1000);
			}
		}catch(Exception e) {
			e.printStackTrace();
		}

	}

}

public class Test01 {

	public static void main(String[] args) throws InterruptedException {

		try {
			Mythread thread=new Mythread();
			thread.setDaemon(true);
			thread.start();
			Thread.sleep(5000);
			System.out.println("我離開Thread對象就不再打印了,也就是停止了");
		}catch(Exception e) {
			e.printStackTrace();
		}
	}

}
本站聲明:網站內容來源於博客園,如有侵權,請聯繫我們,我們將及時處理【其他文章推薦】
※台北網頁設計公司這麼多,該如何挑選?? 網頁設計報價省錢懶人包"嚨底家"
※網頁設計公司推薦更多不同的設計風格,搶佔消費者視覺第一線
※想知道購買電動車哪裡補助最多?台中電動車補助資訊懶人包彙整